Soda Straw Tensegrity Structures
 This
page shows a relatively quick and easy method for making simple but fascinating
tensegrity structures. The only materials needed are plastic soda straws,
small paper clips, and rubber bands. The assembled tensegrity structures
are polyhedral forms which vividly illustrate the separate forces of tension
and compression. They are robust enough to squeeze and jiggle. Rubber bands
provide tension and plastic soda straws provide compression. The instructions
below are for making a tensegrity dodecahedron,
but the underlying technique is suitable for a wide range of polyhedra.
This
page shows a relatively quick and easy method for making simple but fascinating
tensegrity structures. The only materials needed are plastic soda straws,
small paper clips, and rubber bands. The assembled tensegrity structures
are polyhedral forms which vividly illustrate the separate forces of tension
and compression. They are robust enough to squeeze and jiggle. Rubber bands
provide tension and plastic soda straws provide compression. The instructions
below are for making a tensegrity dodecahedron,
but the underlying technique is suitable for a wide range of polyhedra.
Being fast and inexpensive, this is a good classroom project. Based on my kids, I would suggest this as a project for middle school or high school students after they have seen and made paper models of the Platonic solids.
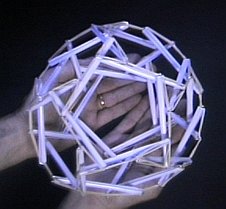
The photo above shows a complete tensegrity dodecahedron. There is one strut (made from half a straw) for each of the 30 edges of a dodecahedron. The struts are rotated slightly compared to a dodecahedron edge, so rather than three struts meeting at a vertex, they make a small triangle.
Step-by-Step Instructions:
- Gather materials for 30 struts. Each strut is made from half a straw, two small paper clips, and one thin rubber band. You also need scissors for cutting the straws in half. Rubber bands of the correct length are essential. They should be about 75% to 85% of the length of the half-straw, so when stretched the length of a half-straw, there is some tension in the rubber band, but not enough to buckle the straw. So find:
- scissors,
- 15 straws,
- 60 small paper clips,
- 30 thin rubber bands.
-
Cut one straw in half. For this model, I started with 8-inch straws, to
make the 4-inch struts shown here.
- Assemble your first strut: Pass the rubber band into the large end of a paper clip and stick the small end of the clip into one end of a half-straw. In the same manner, pass the same rubber band through a second paper clip which gets inserted into the other end of the straw. (If the rubber band is hanging loose after this, it is too long; so either buy shorter rubber bands or use a longer length of straw. Conversely, if it seems that the straw may bend from the tension, get longer rubber bands or cut the straws shorter.)
-
Next, build a second strut, and link it to the first as shown. If you partially
pull out one paper clip of the first strut, you can easily thread the rubber
band of the second strut through it. Have them meet at a point about one
third of the way from one end.
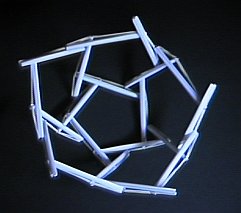
- Make three more struts and link them similarly so as to close a 5-sided loop, seen in the center of this figure. This corresponds to one pentagon of the underlying dodecahedron.
- Next add five outward-pointing struts, each of which connects to the 5-sided loop in two places. The figure shows three of these five new struts surrounding the central pentagon:
- The one on the right is connected at its two points and so makes a small triangle --- one such triangle appears at each vertex of the dodecahedron.
- The one in the middle has one of its two connections made and needs a second to close its triangle.
- The one on the left is in position, but needs both connections.
- The pentagon and five outward struts of the above steps provide three of the five sides for the next five pentagons, surrounding the central pentagon. Finish each of these five pentagons and you can see half of your complete dodecahedron, as in the figure at right. Just remember to complete each loop of struts to have 5 sides. You are actually two thirds done at this point, as you have used 20 of the 30 struts. Be careful that the rubber bands are all on the same side: in the image above, the rubber bands are on the top; at right this has been turned over so the rubber bands are on the outside and the straws are on the inside.
- Continue building pentagons for the second half in a similar manner until complete. Just remember that each rubber band contacts four others --- at the ends and at the 1/3 and 2/3 points. Every endpoint spirals into a little triangle going in the same direction (either all clockwise or all counterclockwise, it is up to you.)
- When done, adjust the struts so they meet each other close to the 1/3 and 2/3 points, and you're done.

Going Further:
Make some other Platonic solids with the same method. The number of struts
needed is just the number of edges in the polyhedron. For example, a tensegrity
cube has twelve struts, making squares (cycles
of four) rather than pentagons.
You can slide the straws along the rubber bands to make them meet at a point other than the 1/3 and 2/3 points. If you slide them to meet as close to the endpoints as possible, the little triangles shrink to nothing and you get a dodecahedron. If you slide them to meet above the midpoints of the straws, you get a kind of icosidodecahedron in which the straws form six big pentagons, like equators, which weave in and out through each other.
Note how the tensegrity structure is chiral, meaning that it has a left handedness or right handedness. You can construct its mirror image, or just look at its reflection in a mirror, which has the opposite handedness. Visualize how if you could turn yours inside out, it would switch handedness. In contrast, a plain dodecahedron is the same as its mirror image, and so is not chiral.
Observe how no two struts in a tensegrity structure touch each other,
yet the diameter of the overall the structure is roughly twice the length
of a stick. There is nothing else like this: with an overall size larger
than the size of its rigid components, yet the components are not rigidly
tied to each other. The compression lies in disconnected pieces. Experiment
with other shapes than just spheres.
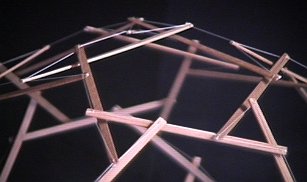 Although
the soda straw method can be applied to other polyhedra, very complex tensegrity
structures will be too flexible unless the rubber band is very tense. But
a taut rubber band will cause the plastic straw to buckle, which is the
ultimate limitation of this technique. For more complex polyhedra, stiffer
struts --- wood or metal --- are essential. This photo shows a part of
one, based on the truncated icosahedron,
which I made from wooden coffee stirrers and dacron thread. (Another
photo.)
Although
the soda straw method can be applied to other polyhedra, very complex tensegrity
structures will be too flexible unless the rubber band is very tense. But
a taut rubber band will cause the plastic straw to buckle, which is the
ultimate limitation of this technique. For more complex polyhedra, stiffer
struts --- wood or metal --- are essential. This photo shows a part of
one, based on the truncated icosahedron,
which I made from wooden coffee stirrers and dacron thread. (Another
photo.)
You will have noticed that rubber bands are rather stretchy, so your structure bounces and deforms easily. To make a more rigid structure, you can use a piece of string instead. This requires careful measurement so that each string is exactly the correct length. String solves another problem also: after about a year, a rubber-band tensegrity structure will self-destruct as the rubber becomes brittle with age.
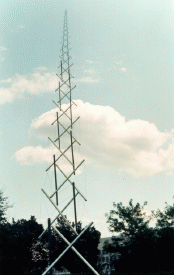 Tensegrity
structures need not be spherical or based on a polyhedron. The concept
of tensegrity was first realized by the sculptor Kenneth Snelson, who began
constructing structures in 1948 and showed them to Buckminster Fuller.
The term "tensegrity" was coined from the phrase "tensional integrity"
by Fuller, who proposed that the method could be applied to large architectural
domes. However, the flexibility of the result is not suitable for most
space-enclosing purposes, and has found much more interesting application
in sculpture. At right is Needle Tower by Kenneth Snelson, an 18
meter tall sculpture at the Hirshorn Museum and Sculpture Garden of the
Smithsonian Institution, Washington, D.C. The lower components are larger
in size, which gives the viewer standing at the bottom an unusual sensation
that the artist has captured infinity.
Tensegrity
structures need not be spherical or based on a polyhedron. The concept
of tensegrity was first realized by the sculptor Kenneth Snelson, who began
constructing structures in 1948 and showed them to Buckminster Fuller.
The term "tensegrity" was coined from the phrase "tensional integrity"
by Fuller, who proposed that the method could be applied to large architectural
domes. However, the flexibility of the result is not suitable for most
space-enclosing purposes, and has found much more interesting application
in sculpture. At right is Needle Tower by Kenneth Snelson, an 18
meter tall sculpture at the Hirshorn Museum and Sculpture Garden of the
Smithsonian Institution, Washington, D.C. The lower components are larger
in size, which gives the viewer standing at the bottom an unusual sensation
that the artist has captured infinity.
For more information on tensegrity structures, see the books by Pugh,
Kenner, Gabriel, and Grip, listed in the references.
An advanced mathematical analysis of tensegrity, and pointers to other
references in the literature can be found in the articles "Rigidity" and
"Mathematics and Tensegrity" by Robert Connelly.